I picked up a Xiaomi Bluetooth Low Energy (BLE) temperature and humidity sensor (model code LYWSDCGQ) for just under £11 with the aim of regulating the working environment in my office more efficiently. Here are my thoughts on it and how to get at the data from your terminal.
The device takes a single AAA battery, which is not included (although in other reviews it appears to be). This should last for over a year in principle. It comes with two manuals in four languages. There is not a lot of info in these as it’s a pretty simple device.
The monitor has a monochrome LCD display, so it can be used without the BLE functionality. The temperature is shown in degrees C only, which is fine for me as it’s the best scale.
I tested the accuracy of the sensor by leaving it next to the heating thermostat and comparing the values. They are pretty close so I’m happy that the figures reported are broadly correct. Calibration is a complex process and I don’t need a high level of precision.
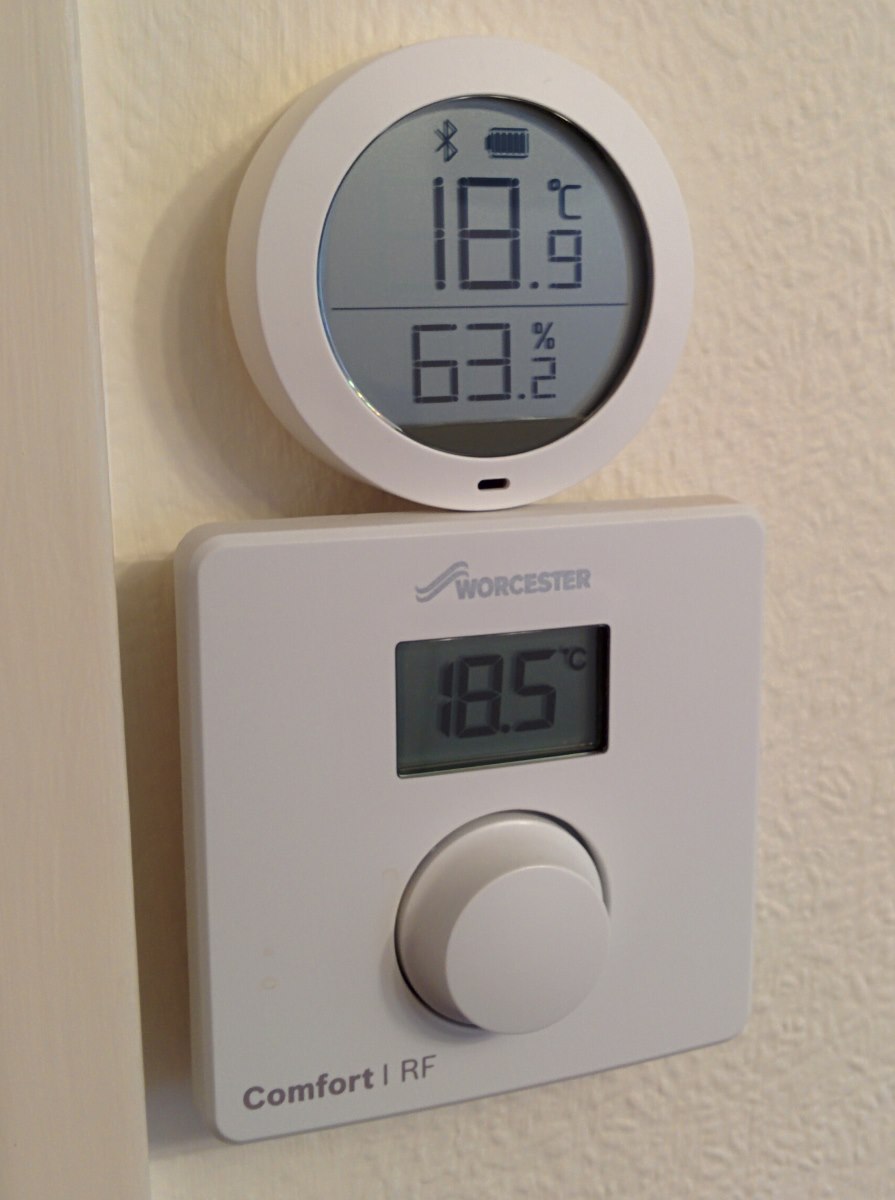
The device comes with a magnetic mount that you can stick to a wall with the included pad. The sensor attaches and detaches easily from the mount and it can rotate a little, which is a nice touch. This means that you don’t need to be too precise in sticking the mount to the wall and can adjust it afterwards. This is important, as according to the Edward Monkton Law Of Straightness, everything must be straight!
Bluetooth LE is a good communication option as it is both low energy and you don’t need any specialised hardware (such as for zigbee or Z-Wave). WiFi would have a better range but the battery life would be terrible.
The range is not great for this device and it’s best to be in the same room as it. It is possible to get data from other rooms but the signal can be lost if moving across them. I tested this from a Linux terminal on my laptop. Don’t bother with the Xiaomi Home mobile app as it’s pretty bad and not needed. Here are the steps to get at the measured parameters.
Getting the Data
First you need to discover the MAC address of the device. There are a couple of ways to do this.
Option one is hcitool but this requires sudo access. Run a BLE scan with the lescan command.
james@XPS13:~$ sudo hcitool lescan
[sudo] password for james:
LE Scan ...
XX:XX:XX:XX:XX:XX (unknown)
XX:XX:XX:XX:XX:XX MJ_HT_V1
00:00:00:00:00:00 Proworks.XXXX
00:00:00:00:00:00 (unknown)
XX:XX:XX:XX:XX:XX (unknown)
XX:XX:XX:XX:XX:XX MJ_HT_V1
00:00:00:00:00:00 (unknown)
XX:XX:XX:XX:XX:XX (unknown)
XX:XX:XX:XX:XX:XX MJ_HT_V1
00:00:00:00:00:00 (unknown)
00:00:00:00:00:00 (unknown)
00:00:00:00:00:00 (unknown)
00:00:00:00:00:00 (unknown)
00:00:00:00:00:00 (unknown)
00:00:00:00:00:00 (unknown)
^C
Use Ctrl + c to exit. You are looking for the address of the MJ_HT_V1 device.
Option two is bluetoothctl, which is interactive and doesn’t require sudo.
First enter bluetoothctl then type scan on to run a scan.
james@XPS13:~$ bluetoothctl
[NEW] Controller 00:00:00:00:00:00 XPS13 [default]
Agent registered
[bluetooth]# scan on
Discovery started
[CHG] Controller 00:00:00:00:00:00 Discovering: yes
[NEW] Device XX:XX:XX:XX:XX:XX MJ_HT_V1
[bluetooth]#
[bluetooth]# quit
Agent unregistered
[DEL] Controller 00:00:00:00:00:00 XPS13 [default]
To exit bluetoothctl use Ctrl + d (or type quit).
Again, you are looking for the address of the MJ_HT_V1 device.
Return of the MAC
Once you know the MAC you can get the data from the device with gatttool.
james@XPS13:~$ gatttool --device=XX:XX:XX:XX:XX:XX --char-write-req -a 0x10 -n 0100 --adapter=hci0 --listen
Characteristic value was written successfully
Notification handle = 0x000e value: 54 3d 31 39 2e 38 20 48 3d 35 37 2e 32 00
Notification handle = 0x000e value: 54 3d 31 39 2e 38 20 48 3d 35 37 2e 33 00
Notification handle = 0x000e value: 54 3d 31 39 2e 38 20 48 3d 35 37 2e 31 00
Notification handle = 0x000e value: 54 3d 31 39 2e 37 20 48 3d 35 37 2e 31 00
Notification handle = 0x000e value: 54 3d 31 39 2e 38 20 48 3d 35 37 2e 31 00
Notification handle = 0x000e value: 54 3d 31 39 2e 38 20 48 3d 35 37 2e 32 00
Notification handle = 0x000e value: 54 3d 31 39 2e 38 20 48 3d 35 37 2e 31 00
Notification handle = 0x000e value: 54 3d 31 39 2e 37 20 48 3d 35 37 2e 31 00
Notification handle = 0x000e value: 54 3d 31 39 2e 38 20 48 3d 35 37 2e 31 00
Notification handle = 0x000e value: 54 3d 31 39 2e 38 20 48 3d 35 37 2e 34 00
Notification handle = 0x000e value: 54 3d 31 39 2e 39 20 48 3d 35 37 2e 31 00
^C
The data is in hexadecimal but as it’s a text encoding it’s pretty easy to eyeball. The string returned is T=nn.n H=nn.n plus the null terminator used in C strings. ASCII aligns with the numerics so I’ve emphasised the relevant digits above.
You can see that the temperature varies between 19.7 and 19.9 degrees Celsius and humidity is between 57.1 and 57.4 %.
Again, use Ctrl + c to exit.
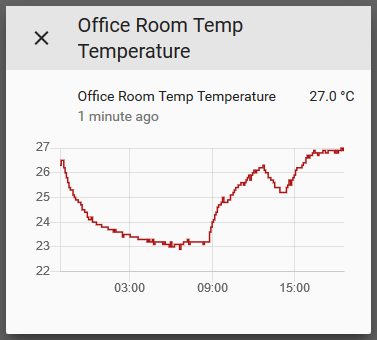
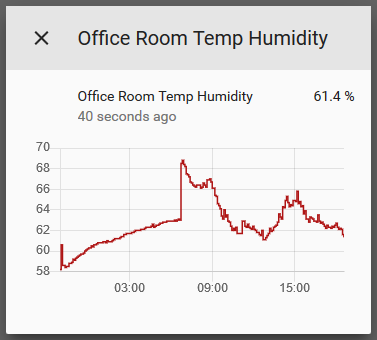
This is fine for testing and checking range but not as a permanent installation. Conveniently, there is a ready-made Home Assistant component and it’s easy to install this on a Raspberry Pi. You’ll want the version 3 or above hardware for the built-in Bluetooth. The Zero W has BLE too but it’s a bit underpowered. Don’t forget to secure your Pi!
I’ve got this running headless on a model 3A+ and there is a web interface with graphs of the logged values. Yes, it gets pretty warm in my office.
I’d previously tried to use a Sense HAT to measure temperature and humidity but it has a design flaw, where the sensor is warmed heated by the Pi, ruining the results. Fortunately, I found a use for it in my wake lamp Glowbe v1 and v2.
The new system not only allows for accurately logging the data but also taking actions based upon the values. For example, I plan to link home assistant to my smart sockets and this could be used to switch on a fan or heat pump for some climate control. I also have some air quality sensors (VOC/eCO2 & PM) that I want to use in my office to monitor hazardous pollutant levels, but that will have to wait for another post.
You can see some more graphs from this temperature and humidity sensor here.